Lab -- Deploying an sklearn model to GCP Cloud Run
In this lab, you will deploy a Flask API to GCP serving a sklearn pipeline, using Github Actions for continuous integration / continuous delivery (CI/CD), which will redeploy the app on code-push.
By Dave Eargle
We’ll do this lab assuming you already have a cloudpickle’d pipeline ready to go, that you’d like to serve from a Flask app.
This lab assumes you already have a GCP account.
We’ll avoid setting up the gcloud cli locally, just to reduce friction.
We’ll make a Docker container that runs gunicorn to serve our flask app.
But first, let’s start from this GCP quickstart tutorial: Deploy a Python service to Cloud Run.
Create a GitHub repo
- Create a new github repository and clone it to your local machine. I called mine
cloud-run-test -
In your new repo, follow all the steps in the section Writing the sample application. This will give you a directory structure like this:
cloud-run-test ├── Dockerfile ├── README.md ├── docker-compose.yml └── requirements.txt - Push your code to GitHub
Create a GCP Project and Service Account
Create a project on GCP that will house this deployment. I called mine cloud-run-hello-world
Now, we have two options. We are going to host our source code on GitHub. We can either give GCP permission to access our GitHub account, or we can go the other way around.
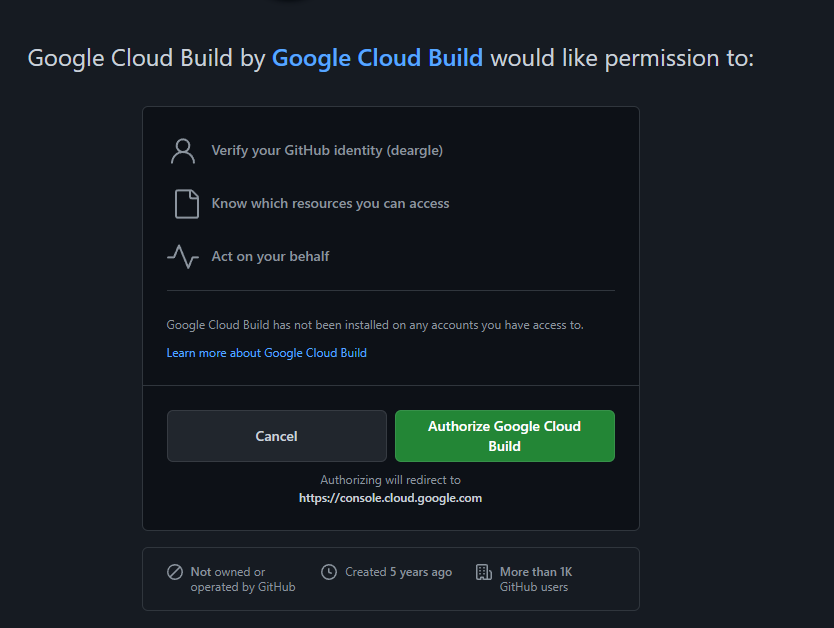
Option 1: Authorize GCP to access our GitHub account.
With this, GCP will have permission to “Act on your Behalf” on GitHub.
That’s too permissive for my liking. If it were possible to limit GCP’s scope to just one repository, I might be more comfortable with it.
But FYI, it would look like this:
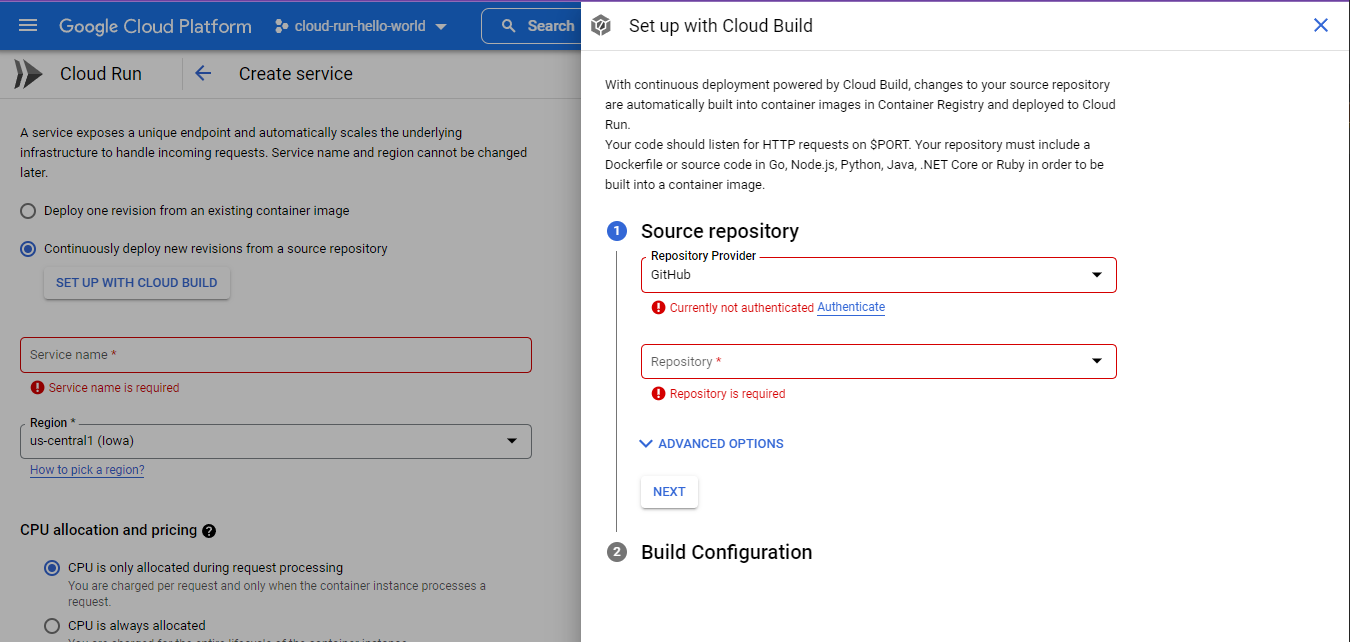
Option 2: Authorize GitHub to access our GCP account.
We set “Secrets” (environment variables) that are used by GitHub Actions, that get triggered on GitHub events, such as a code push.
I prefer this option. We can create fine-tuned GCP “Service Accounts” that only have permission to operate on specific projects.
Let’s do this option.
Create a new Github Action workflow file
Github Action has templates – let’s find one for “Cloud Run”.
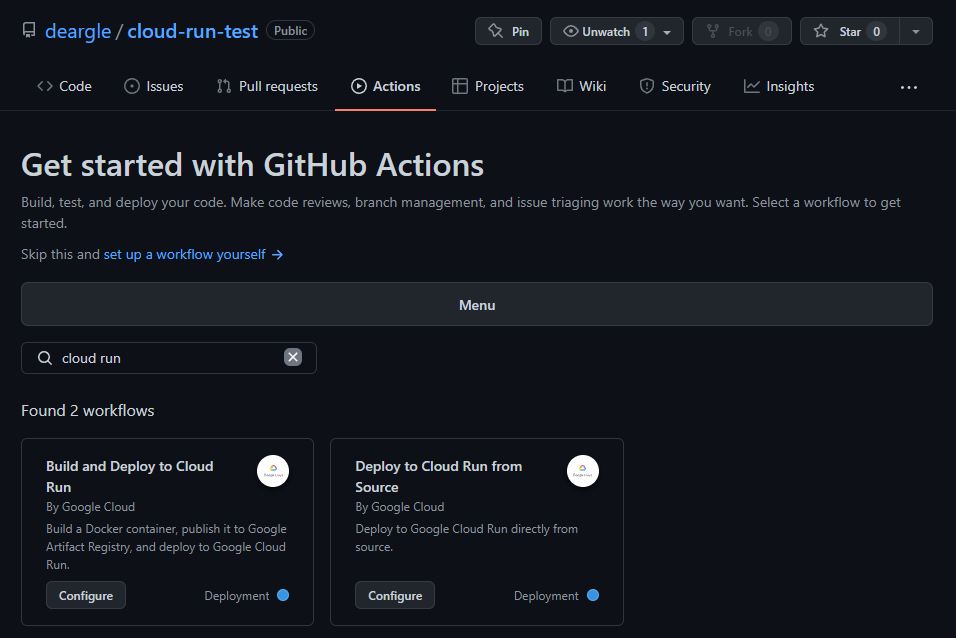
I choose the second one.
Configuring the workflow
Read its documentation – the commentblock at the beginning of the file.
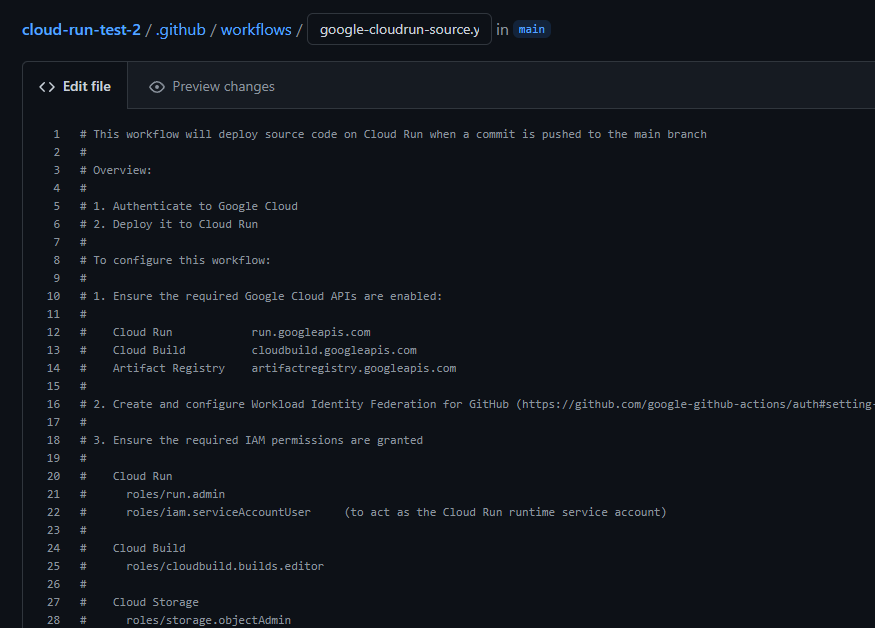
The documentation for this workflow is in the commentblock at the top of the file.
It has five steps.
Step 1: “Ensure the required Google Cloud APIs are enabled:”
It says we need to enable:
- Cloud Run
- Cloud Build
- Artifact Registry
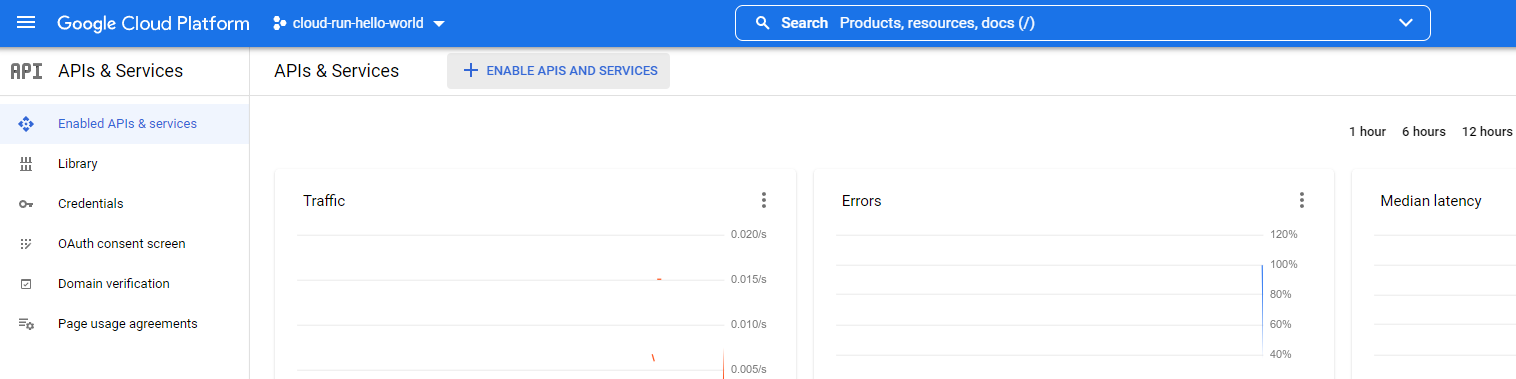
Use GCP Console’s API Services page and its API Library page to make sure each of these services is enabled.
Finding an API
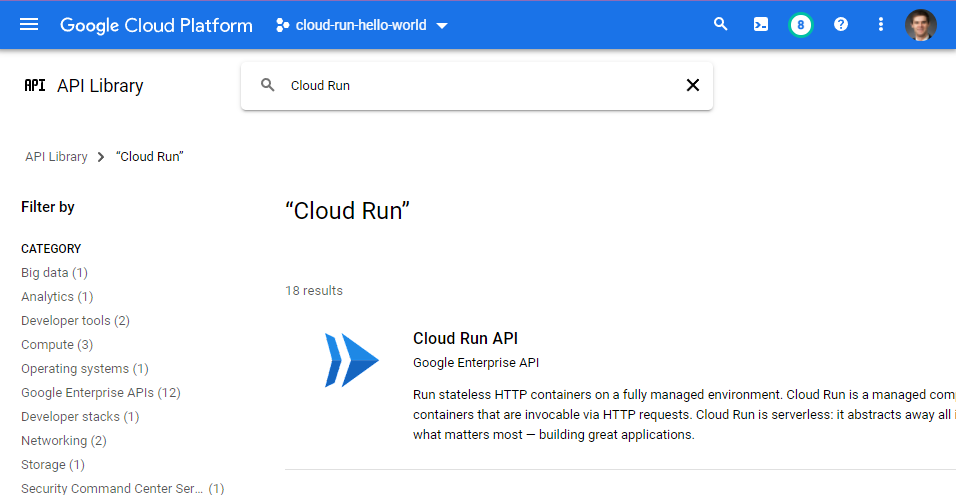
Enabling the Cloud Run API
If you mess up, you will get a helpful specific error message when you try to build telling you which API you need to enable.
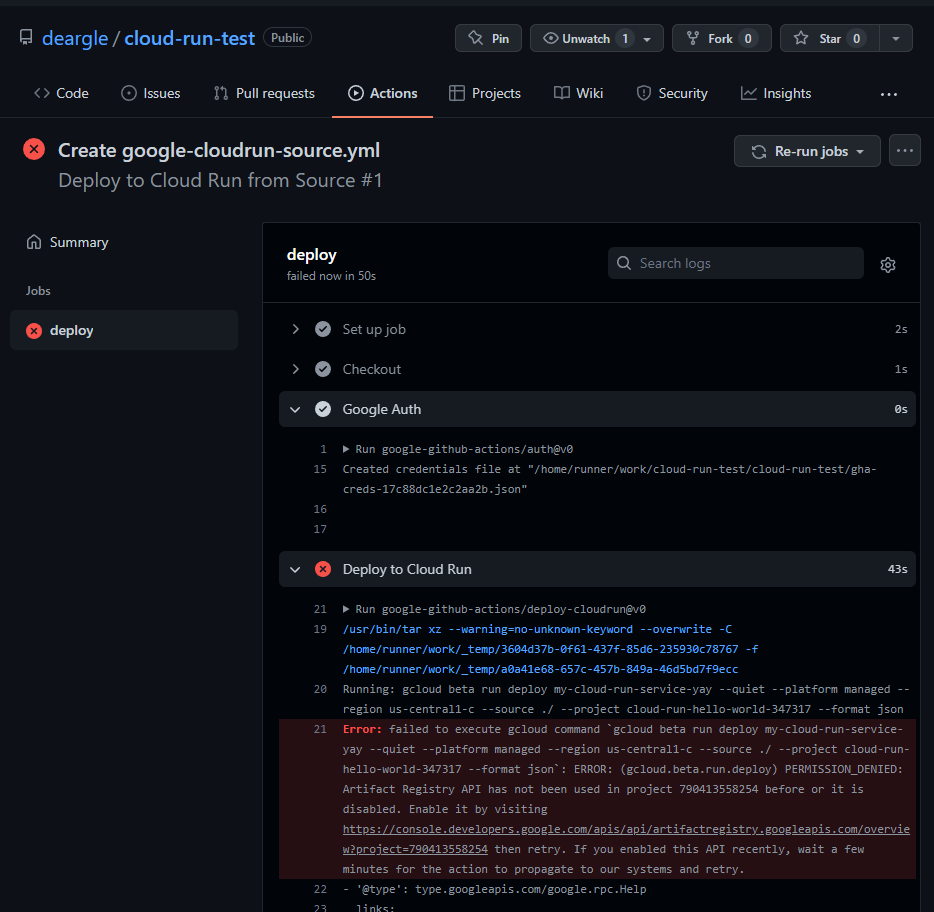
An error telling you to enable an API
Step 2: “Create and configure Workload Identity Federation.”
Follow the link to https://github.com/google-github-actions/auth#setting-up-workload-identity-federation. This page describes google-github-actions/auth, which this Github Action template uses. It says that setting up a Workload Identity Federation would enable GitHub to send requests impersonating a GCP Service Account without needing to authenticate as the service account. Instead, it authenticates as GitHub, which we grant permission to impersonate the Service Account.
Now that looks super cool, but I’m more familiar with Service Account Key JSON (also described on that page), so we’ll do that.
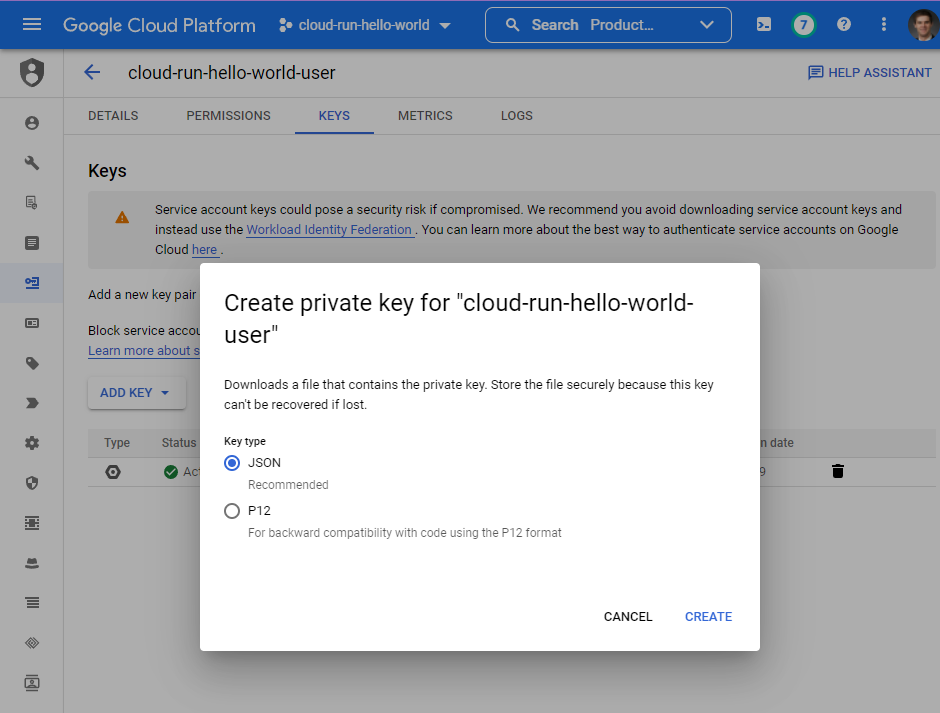
Use GCP Console IAM to create a new “service account”. Note its email address.
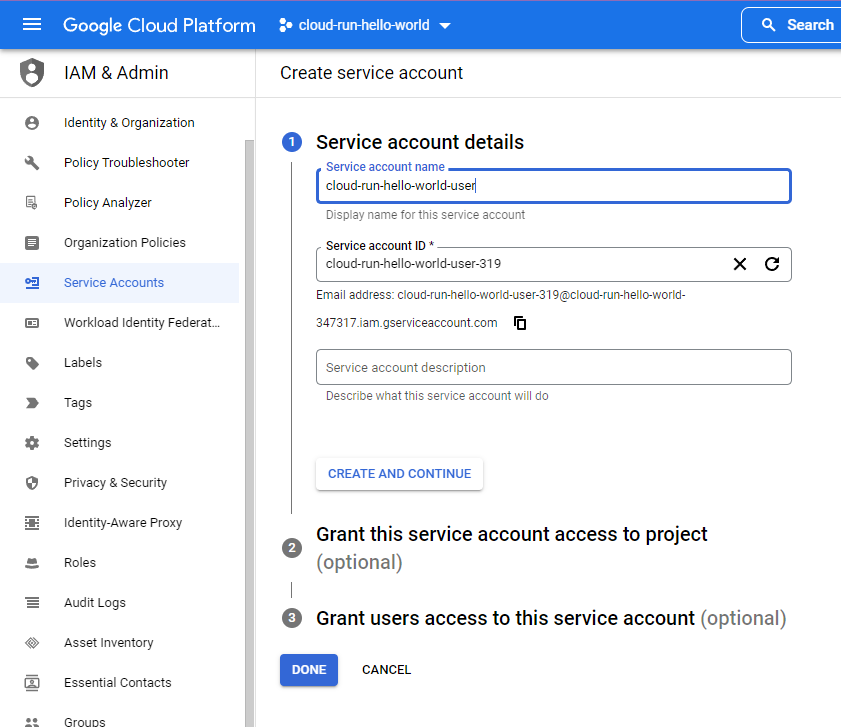
Creating a service account.
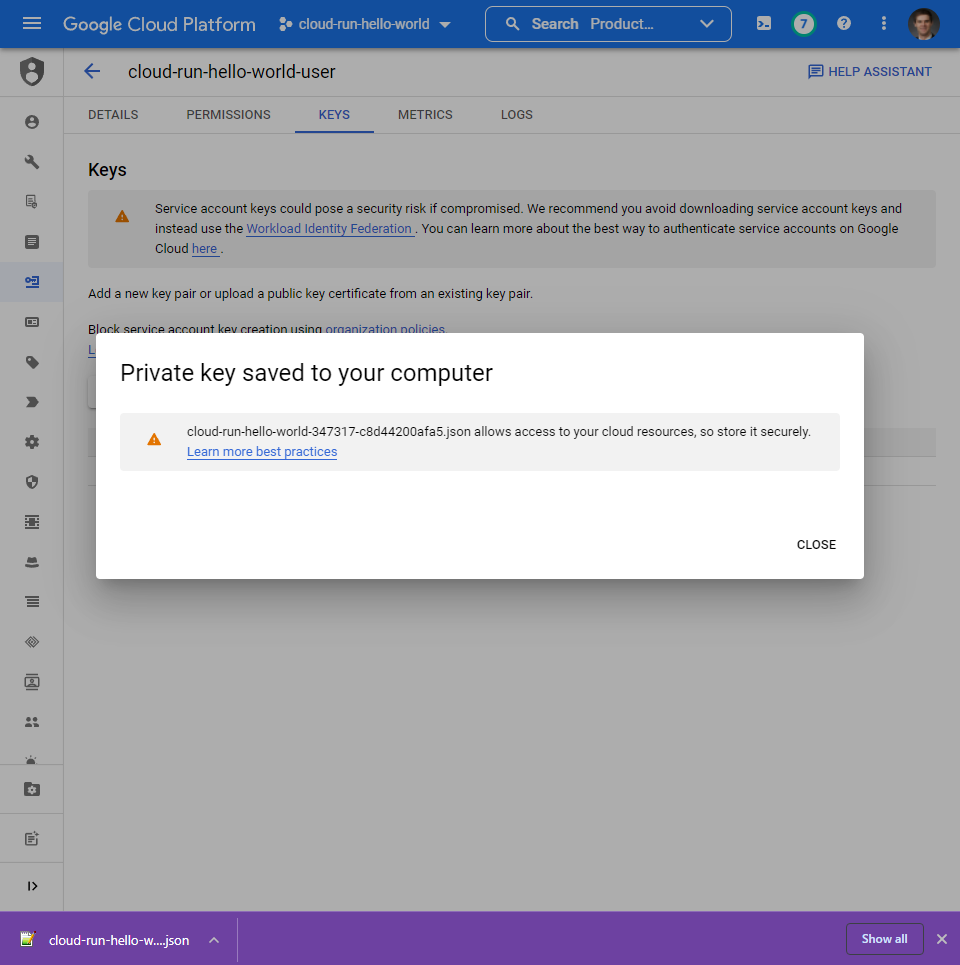
Download a json “keyfile” for this service account. This is how we’ll authenticate from
github as this user.
Scroll down in the workflow file and comment out the first Google Auth block, and uncomment the second one:
#       - name: Google Auth
#         id: auth
#         uses: 'google-github-actions/auth@v0'
#         with:
#           workload_identity_provider: '$' # e.g. - projects/123456789/locations/global/workloadIdentityPools/my-pool/providers/my-provider
#           service_account: '$' # e.g. - [email protected]

      # NOTE: Alternative option - authentication via credentials json
      - name: Google Auth
        id: auth
        uses: 'google-github-actions/auth@v0'
        with:
          credentials_json: '$'
But right now, even though we can authenticate as this user, this user isn’t authorized to do anything. Let’s fix that.
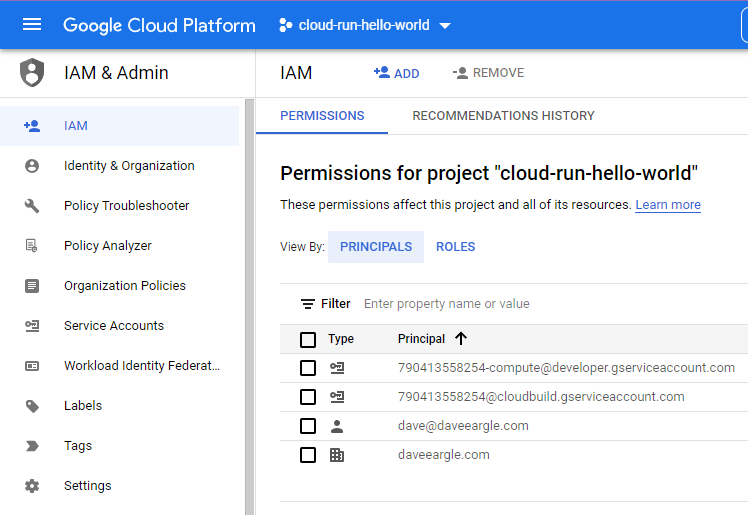
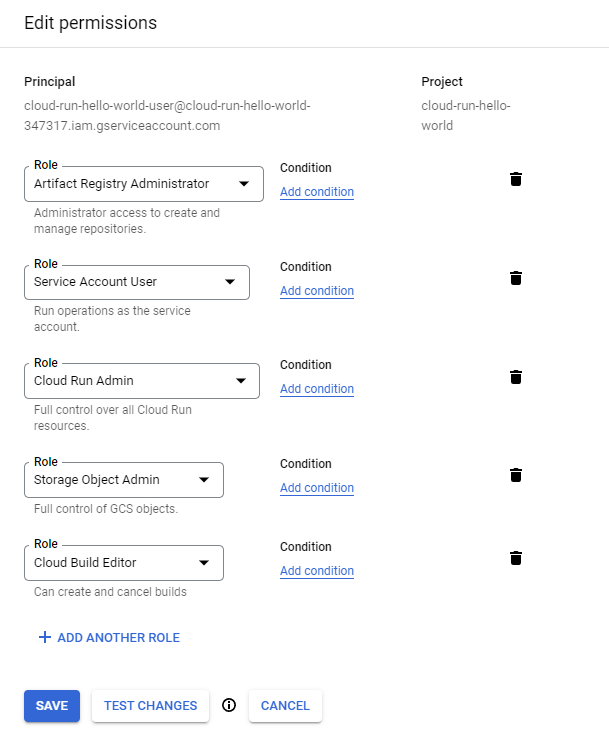
Step 3: Ensure the required IAM permissions are granted
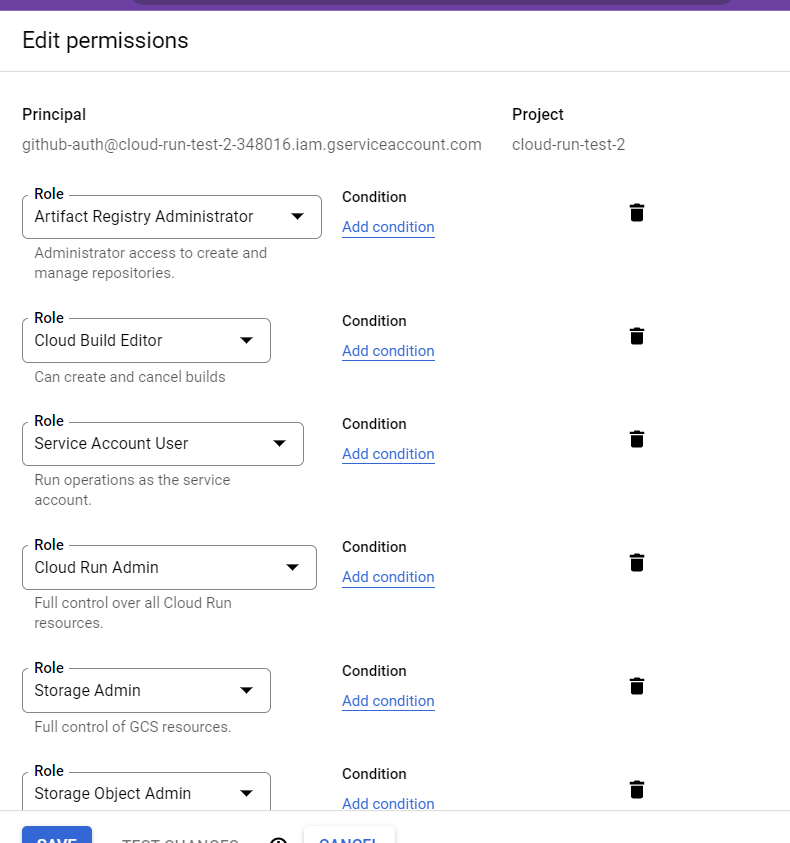
Give our service account the permissions that the workflow docs say it needs:
- Cloud Run Admin
- Service Account User
- Cloud Build Editor
- Storage Object Admin
- Artifact Registry Admin
To do this:
- Visit the “IAM” page for your project.
-
Click to add a “principal.” Begin to type your service account’s email address – it should suggest an auto-complete. Choose this.
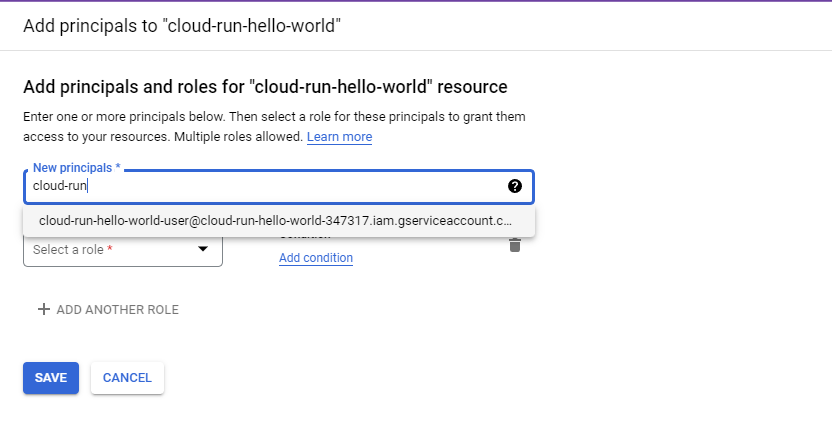
- Add all of the “Role”s shown below:
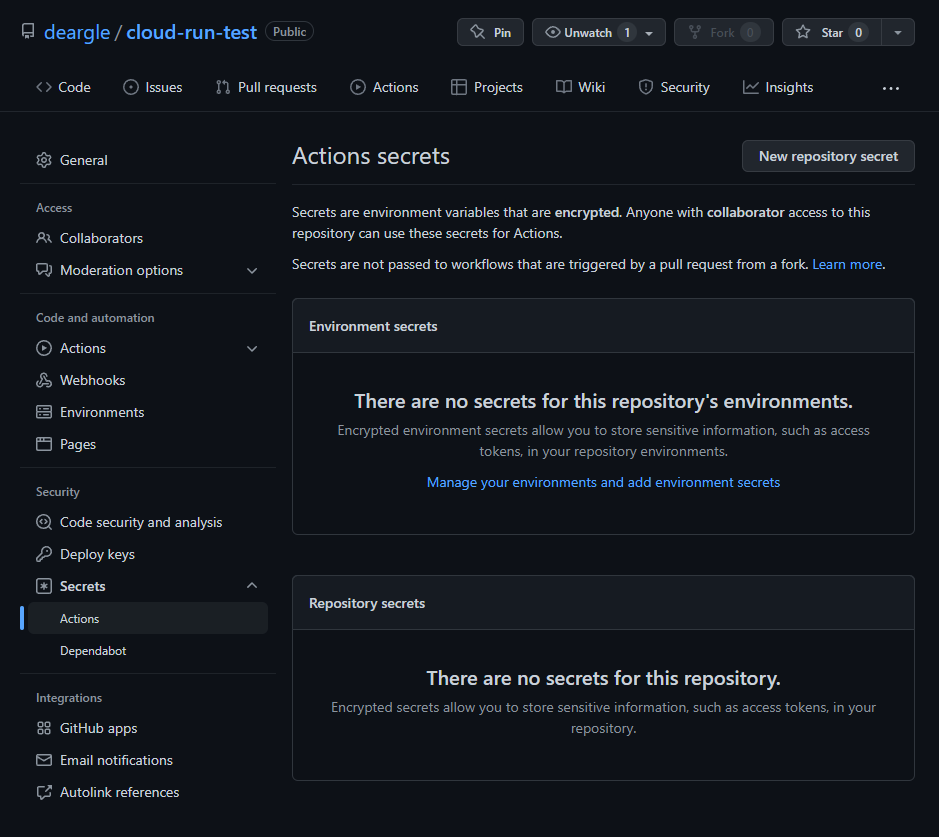
Step 4: Create GitHub secrets
GitHub “Secrets” are a way to pass sensitive values to your workflows via environment variables.
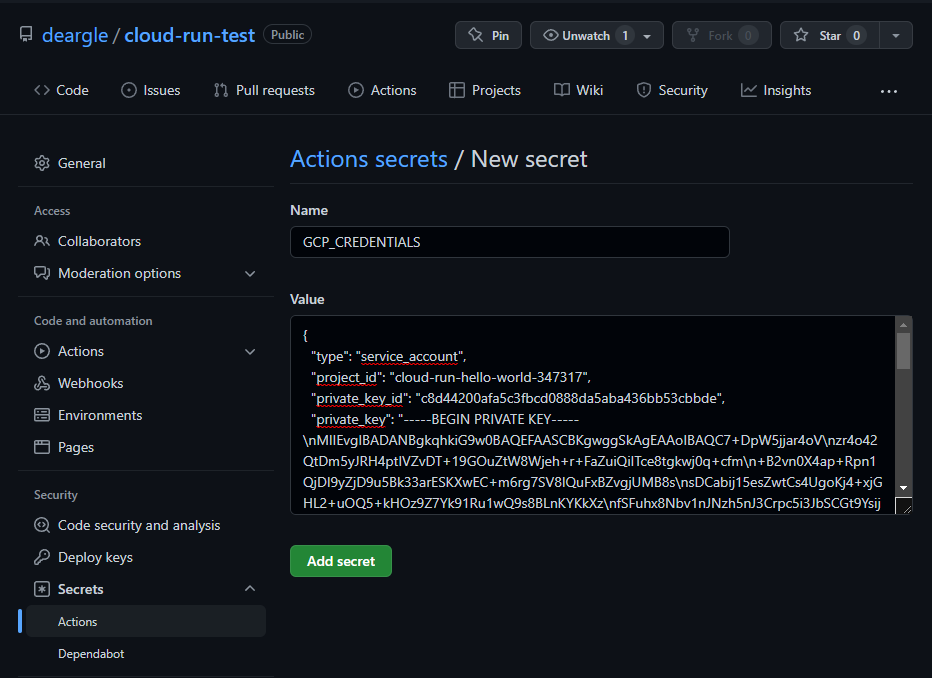
Look at the Google Auth entry in the YAML again. Note that it templates ${{ secrets.GCP_CREDENTIALS }}. We need to set this as a “Secret” in our github repository.
It should be the text value of the json keyfile you downloaded earlier, when you
created the service account.
Visit your repository’s “Secrets” page, and click to add a new secret:
Step 5: Change the values for the SERVICE and REGION environment variables (below).
Scroll to around lines 54-57 in your workflow file. You will see three env vars that must be updated:

We need to set PROJECT_ID, SERVICE, and REGION under the env key.
PROJECT_IDhas to match your GCP project’s id. You can find it from your GCP console project selector: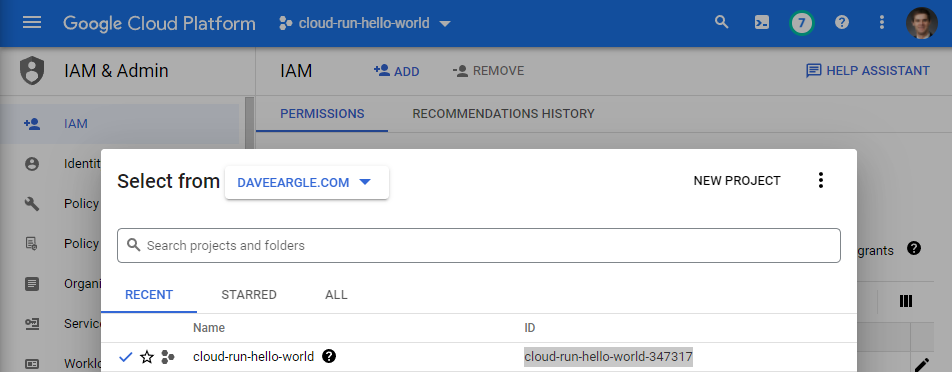
SERVICEcan be any text value.REGIONhas to be from the list shown when you rungcloud artifacts locations listfrom a gcloud shell. I arbitrarily choseus-central1.
env:
  PROJECT_ID: cloud-run-hello-world-347317 # TODO: update Google Cloud project id
  SERVICE: my-cloud-run-service-yay # TODO: update Cloud Run service name
  REGION: us-central1 # TODO: update Cloud Run service region
Commit your workflow, and watch the build
Commit your workflow file.
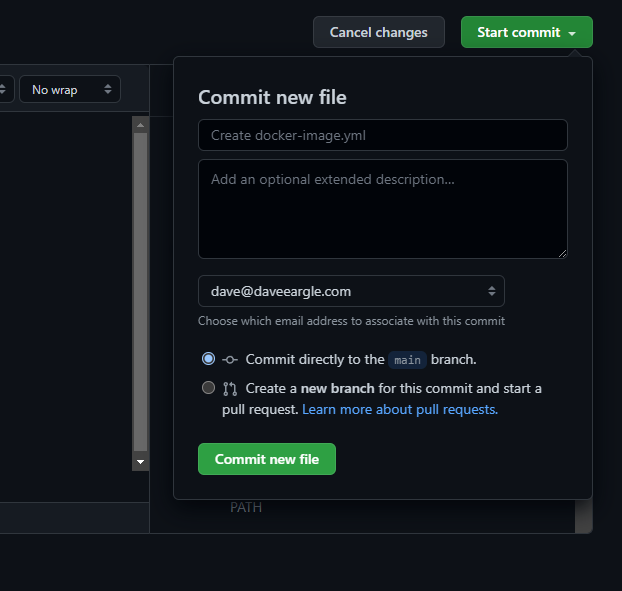
This will create a new file in your repo in a new .github/workflows folder.
The creation of this file, in turn, triggers your workflow to run, since I think because we configured it at the top to run on any push.
Watch it run:

An error!
Oh no, it threw an error!
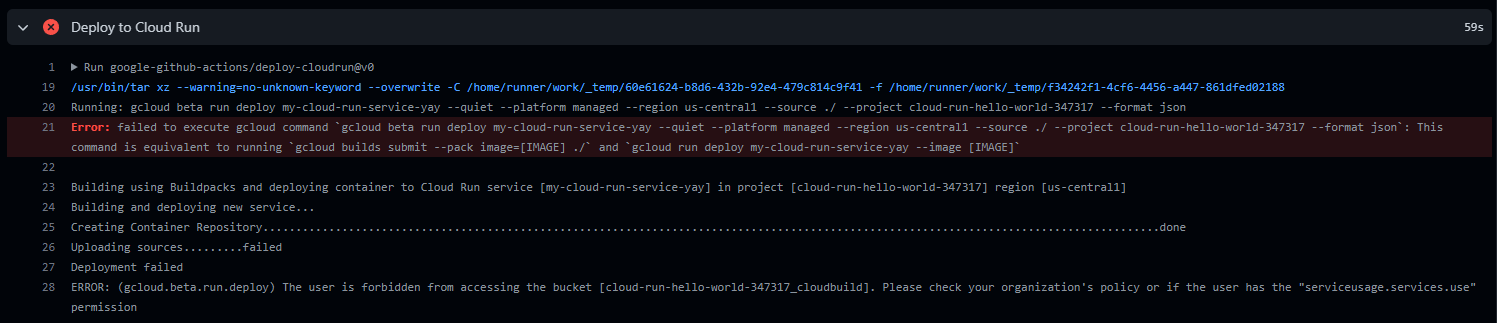
So I go back to the GCP cloud console and take a guess and add another permission: “Storage Admin”. Now my permissions list looks like this:
I rerun my action.
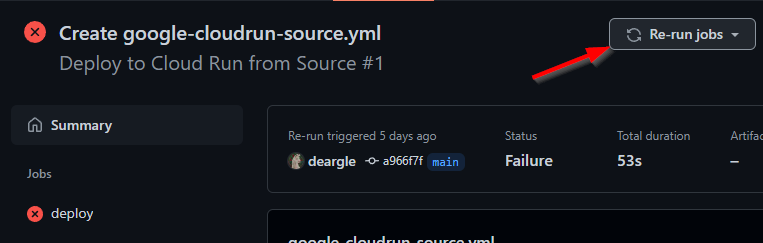
It worked this time!
Attempt to access the service’s web url
Part of the build process was to print out your service’s endpoint url.
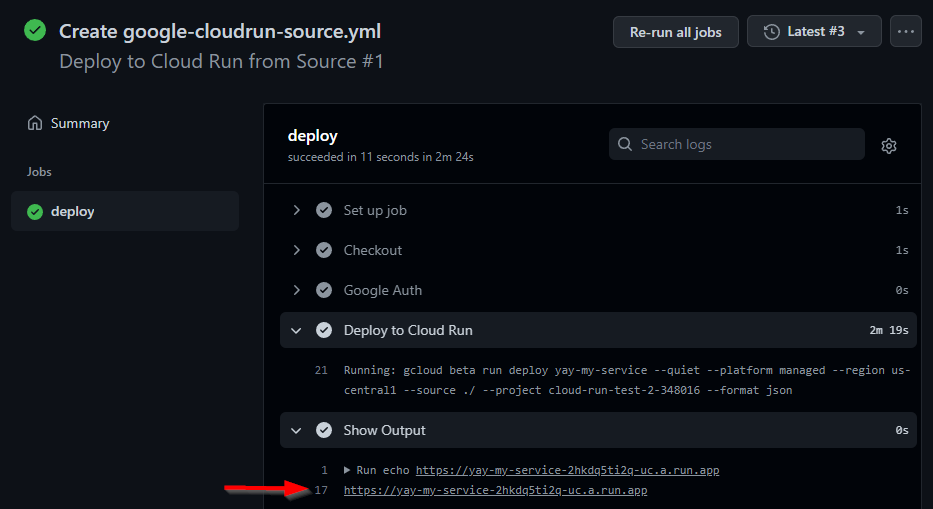
Access it in a browser:
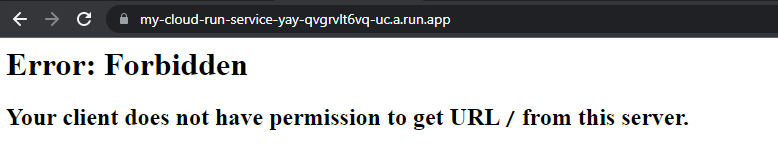
Oh no, access denied!
Do some google searching, and eventually come across this note:
A Cloud Run product recommendation is that CI/CD systems not set or change settings for allowing unauthenticated invocations. New deployments are automatically private services, while deploying a revision of a public (unauthenticated) service will preserve the IAM setting of public (unauthenticated). For more information, see Controlling access on an individual service.
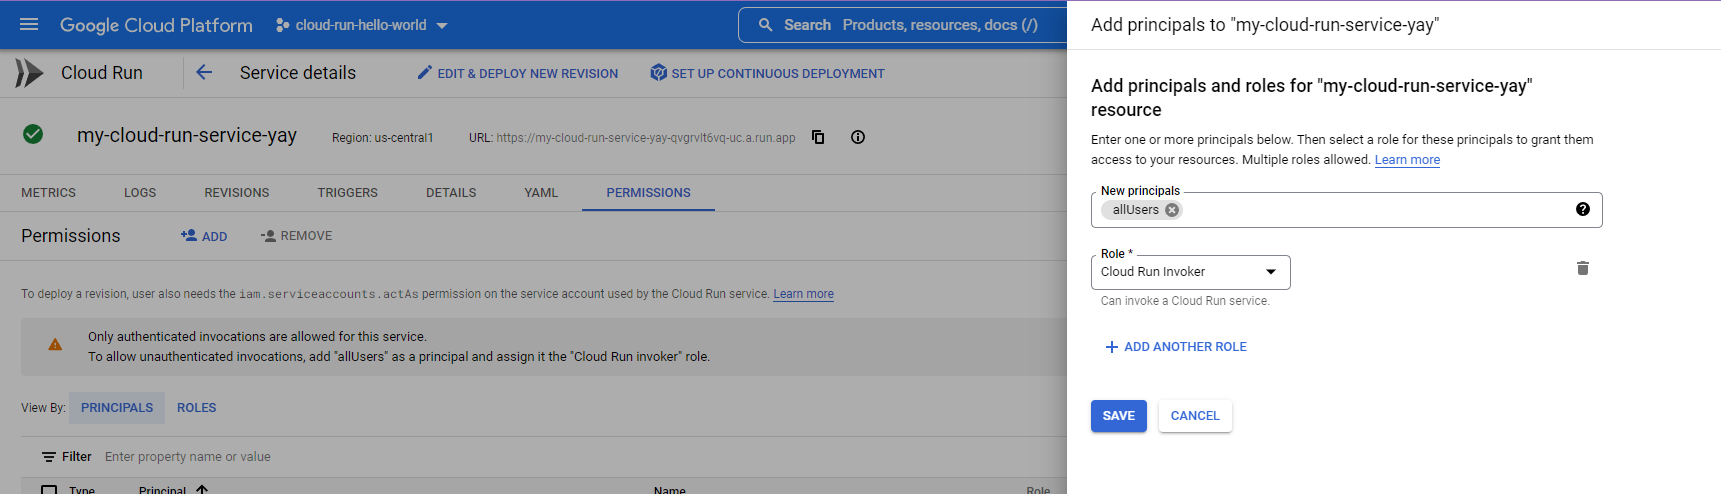
Grant public invoker access and try again
Okay, so let’s manually enable unauthenticated requests. We have to give “invoker” rights to “allUsers”:

Note: This is an "evoker", not an "invoker"
Retry your web url:

Phew, we did it! Holy smokes we did it! We have CI/CD set up for an amazing hello-world!
Deliverable: Modify your repo to serve a ML model
Now, we can develop our Docker container gunicorn app locally, and then git-push our changes to our github repo, which will trigger a redeploy of our Cloud Run service. Hot dog!
Your goal is to write a Flask API with a /predict route that accepts posted JSON.
Tips
Develop locally, then deploy when ready!
Use skills you have learned in previous labs to develop your app locally. Only once it’s working locally should you begin to deploy it to Cloud Run.
Remember you have Different Environments
Your app will run in two different environments:
- When you are developing locally and use
docker-compose up, you’ll use Flask’s development server - When your container runs on GCP Cloud Run via just
docker run, it will usegunicorn’s server.
This means that locally, flask-specific environment variables will be respected, but they will have no effect when run on GCP. This is good! That’s exactly what the flask built-in development server is intended for.
Required files
Make a new github repository that contains only the following files. Submit a link to this repository.
The files should include:
cloud-deploy
├── .dockerignore
├── .gitignore
├── .github
|   └── workflows
|       └── google-cloudrun-source.yml
├── docker-compose.yml
├── Dockerfile
├── main.py
├── phish-model-1649995335.cloudpickle
├── README.md
├── requirements.txt
└── make-request.py
Use this model!
Use the following model in your app. You can commit the file to your repository.
phish-model-1649995335.cloudpickle
Specify in your README where this model came from
This is an sklearn pipleline. It was fitted using a completed version of this notebook, and hence:
- it should be unpickled using the
cloudpicklepackage - it was trained on PhishStorm data
- it uses a
svm.SVCmodel as its classifier, and can do.predict()(it can’t do.predict_proba()) - it expects to be given a pandas df with one column called
domain - each url is expected to already have the protocol stripped.
- For example,
example.com, nothttp://example.com
- For example,
- each url can also include the path and any query
- For example,
example.com/subpath/yeetis valid.
- For example,
- each domain portion of the url must end with a
/, even if the url does not include a path- For example,
example.com/, notexample.com
- For example,
README.md
Minimum contents:
- an overall description of the repository
- Should describe how this is an API, and what it is used for
- The public url that can be used to consume your Cloud Run Services API
- a
docker-composecommand to run your Flask container - Should have a usage example:
- a
docker-composecommand to executemake-request.pywithin a running container.
- a
Dockerfile
You can start from the Dockerfile that is in the GCP Cloud Run python example – specifically, this file.
Attention!
But you must modify the python version to be the same as what the model was trained with: python:3.8
- You can use
python:3.8-slim
docker-compose.yml
This file will only be used for local development!
- It should invoke
flask runinstead of the Dockerfile’s defaultCMDofgunicorn. - Hint: use thecommandkey to override the Dockerfile’sgunicornCMD.
.gitignore
- It should exclude stuff that needs to be excluded.
requirements.txt
-
Use this
requirements.txtfile:Flask==2.0.3 requests==2.27.1 scikit-learn==1.0.2 cloudpickle==2.0.0 pandas==1.4.0 gunicorn==20.1.0
main.py
This is your Flask app.
main.py for our Flask app, not app.py. This is because the example
Dockerfile CMD specified main:app and not app:app., and we are lazy, but in a good way.Config
- Run the Flask app without the debugger but with the reloader.
- Do this in your docker-compose file, don’t set Flask envs in your Dockerfile!
-
The following environment variables in your docker-compose should work:
environment:
  FLASK_ENV: development
  FLASK_DEBUG: 1
  FLASK_RUN_RELOAD: 1
  FLASK_RUN_DEBUGGER: 0
  FLASK_APP: main.py
  FLASK_RUN_HOST: 0.0.0.0
- As in the flask docker json api lab, exceptions inside Flask routes should be returned as JSON, with the stacktrace printed to stderr.
Routes
Your flask app should have the following routes, all of which must return JSON:
- A
POSTroute named/predict- expects a
listof URLs - Attention! There are two data-preparation annoyances that should have been dealt with at pipeline-creation
time, but alas, you have to deal with them here, in this route.
- Your route must take care of removing any protocol in the url
- e.g., it must remove things like
http://,https://,ftp://, and more. - Hint: use regex
- e.g., it must remove things like
- The pipeline expects every URL to have at least one
/in it, after the domain. Ensure that it does!- e.g.,
yeet.comwould need to be replaced withyeet.com/.
- e.g.,
- Your route must take care of removing any protocol in the url
-
returns predictions for whether each URL is a phish, using the following format:
{
  timestamp: TIMESTAMP,
  predictions: [
    {
      url: URL_1,
      prediction: PREDICTION
    },
    {
      url: URL_2,
      prediction: PREDICTION
    },
    # ... one for each posted URL
    {
      url: URL_n,
      prediction: PREDICTION
    },
  ]
}
- expects a
- All routes should have a docstring. See pep-257. You may write any docstring, as long as it’s somehow route-relevant.
make-request.py
This file should use the requests library to
hit your flask app predict route.
Complete the template below.
# ~~~ make-request.py ~~~

urls = [ # all stolen from https://phishingquiz.withgoogle.com/ on 2022-04-27
  'https://drive--google.com/luke.johnson',
  'https://efax.hosting.com.mailru382.co/efaxdelivery/2017Dk4h325RE3',
  'https://drive.google.com.download-photo.sytez.net/AONh1e0hVP',
  'https://www.dropbox.com/buy',
  'westmountdayschool.org',
  'https://myaccount.google.com-securitysettingpage.ml-security.org/signonoptions/',
  'https://google.com/amp/tinyurl.com/y7u8ewlr',
  'www.tripit.com/uhp/userAgreement'
]

def do_request(urls):
  #    1. Make the request
  #    1. Check the request for errors; handle (print) errors if so
  #    1. Assuming no errors, print the predicted response
  pass

# 1. First, `post` all the urls at the same time
do_request(urls)

# 2. Then, loop over the urls and post one at a time.
for url in urls:
  do_request([url])
Github Action Workflow
- You should write a Github Actions workflow that deploys your repo to Cloud Run on push.
Recommended Path to Completion
This is a big deliverable! Here’s a recommendation for how to go about completing it. Test that things are working at each step.
- Get the Hello World GCP Cloud Run working
- Get your local flask docker-compose dev environment working.
- With live-reloading
- with the development server
- Without the debugger
- With errors caught and printed
- Write a
/predictroute that loads your model, and nothing else - Modify that route to feed a static url into the model, and return a prediction
- Modify that route to get a list of urls from a POST as json, and feed them into the model.
- Handpick the URLs to be ones that don’t have the protocol and
/problems
- Handpick the URLs to be ones that don’t have the protocol and
- Modify the return value format to match the expected format
- Modify the route to handle the
://and/problems - Deploy your route to Cloud Run
- Do all the README stuff
- ??? Profit