Lab -- Github, Markdown, and You
Old people say "if you want a job, you must make a good LinkedIn profile." I say pfft. Make a good github profile instead (or other hosted code repo profile). DIY ftw.
By Dave Eargle
This lab is split into three parts.
- The first two parts do not require any command-line use – they can be done exclusively from a browser.
- The third part requires using the command line to run a docker container.
- I’ll post an introduction-to-the-command-line page, coming soon.
At the end is a rather lengthy “supplemental” section, with information on things like buying and using custom domain names for your website, and blogging with jekyll. These are pet topics for me, and they’re literally super cool. Try them if you dare!
Part 1: Introduction to Github and Markdown
Create a nice github account
Create a github account, and make it presentable.
Do the following:
- Choose a username that you won’t mind appearing on a resume.
- Github username are changeable.
- Set a nice profile picture for yourself, and set your name and
organizational affiliation.
- This helps others know they’ve found the right account, if they’re searching for you.
Lab requirement: Make a github profile following the above guidelines.
Do a “Hello World” github project
Now, complete the GitHub “Hello World” project. This will teach you how to use Github.
Learn about writing in Markdown
Plain text wherever possible is an important part of the Unix Philosophy. Markdown follows that Philosophy. It is an “easy-to-read, easy-to-write plain text format” that can be converted into HTML.
Skim both of these guides for an introduction to writing in Markdown on GitHub. You will need some of this later in the lab.
Part 2: Create a portfolio website
Github has a service called Github Pages for creating websites. Skim that page. They try to make the service easy-cheese to use.
The default Github Pages “themes” are tailed for either blogs or projects. But you want a portfolio!
For your portfolio website, I recommend that you use @evanca’s ‘quick-portfolio’ theme. To do so, follow @evanca’s instructions on Medium.
Side note: Evanca's theme is a customization of the jekyll-theme-minimal theme.
Visit that link and skim the README for customization info. @evanca's theme follows these instructions and makes a few small tweaks to make the site more portfolio-related. If you wanted to customize @evanca's theme further, you could follow the same instructions.
Lab requirement: For this lab, you only need to get a basic website up with a picture, your name, and a two-liner something-about-you quip.
But over the course of the semester, I’ll have you link to at least three portfolio pieces to your website. Due dates for those will be separate.
How did I make a website without writing HTML?
Time for acronyms! Read this section, it helps to understand stuff later in this lab.
Websites can either be dynamic, or static.
- Dynamic websites have a server that does stuff before content is sent to browsers. The stuff it does depends on content the browser sends it – like make the browser sends a login token, and the server pulls account info out of a database and returns it for that login. In that way, dynamic websites care about state.
- Static websites don’t care who is making the request. Everyone gets the same content. In that way, static websites are stateless (from the server’s perspective). (Note that the content can do dynamic stuff after it arrives, via javascript, but since the server didn’t do anything dynamic it’s still a static site.)
Cool vs uncool:
- Bloggers think it’s cool to have static blogs. Static websites usually load faster than dynamic websites, because there’s no dynamic stuff involved.
- Static websites aren’t susceptible to being hacked in the same way that dynamic websites are. Dynamic websites like Wordpress or Drupal sites get pwned all the time because of things like add-ons with vulnerabilities. Some add-on vulns mean that attackers can execute arbitrary code on the server, which is a “bad thing.”
- It’s cool to have a cool-looking blog. That’s one thing that makes dynamic websites cool – html page content can be dynamically pieced together, permitting cool combinations of stylization and whatnot, with page content being pulled separately from stylization, from a database or something.
- It’s uncool to have to cram a bunch of styling information into each and every static blog page. That’s one downside of static sites – each request returns a single file. That means that every file has to include all stylization information, repeated ad nauseam for each file. Maintenance is a nightmare. It’s cool to make something else do all the stylization stuff.
Static Website Generators are the cool answer to all of the above. For writing,
content is kept separate from stylization. (Content can be written in Markdown.)
Point the generator at the project, and it will create one html file for each
possible webpage, merging together stylization and rendered content. Sounds
great! ![]()
Under the hood, Github Pages runs a static website generator called Jekyll. Jekyll is, therefore, cool, by definition.
When you commit code to a github-pages-enabled repo, github runs jekyll against it to generate the static content that gets served when you visit the pages url. This happens by default for any pages-enabled github repo, unless you explicitly disable jekyll for your repo.
Sign the class website yearbook
Once you have completed the “Hello World” project, skimmed the markdown guides, and launched your website, you should be able to sign the class yearbook.
Submit a pull request to edit the class repository.
Specifically, “sign” the class repo index.md page (find the yearbook URL on canvas).
Follow the example already there for “Dave Eargle” – include a link to your
github profile (e.g., https://github.com/deargle), and to your built website (e.g., https://deargle.github.io). Once you have opened the pull request, submit a link to your pull requests.
Requirements: Your github profile and your website should meet the minimum “lab requirement” criteria specified in the respective sections above.
Part 3: Developing Github Pages sites locally
It’s a pain in the butt to have to wait for github to rebuild your website to see change you’re trying to develop. And what if it looks bad! Anyone on the internet could see it!
Cool kids render their websites locally instead, before pushing changes live. Let’s do that, using Docker.
Install a nice text editor
You need a nice text editor. I like Atom. For this lab, download and install Atom. After, if you hate it, you can abandon it.
Clone your repo
Next, you need a git client, and why not one that is also github-aware.
- Install GitHub Desktop.
- Then, use it to “clone” your github pages repo to your local computer.
- For help, read this guide.
- Then, use Github Desktop to open your repo in Atom. You’ll edit it there later.
Read about the jekyll/jekyll docker image
To build your site locally, you need to run Jekyll locally. Jekyll is a ruby app.
Skim the jekyll install docs including the guide for your OS. Read until you realize that it looks painful to install jekyll. And that’s right, it is painful!
This is exactly the kind of pain that Docker exists to fix.
We will use the jekyll/jekyll
docker image. This image already has jekyll installed inside it. We just need to
make the repo’s files available to the running docker container, so that jekyll
can build the site.
Skim the image’s README, but don’t do anything yet.
Add a Gemfile to your project
Jekyll is a ruby program. ruby library packages are called “gems”. A project can include a Gemfile to specify
the gems that it needs.
Use Atom to add a file called Gemfile to the root of your repo with the following contents:
# Gemfile
source 'https://rubygems.org'
gem 'github-pages', group: :jekyll_plugins
This says that our project needs the “github-pages” gem. That gem in turn includes many other gems.
Run jekyll docker container
Install Docker-Desktop if you don’t already have it.
Now, open a terminal in the directory of your cloned repo.
- You can see where your repo is located on your filesystem by using the “View the files of your repository” button in Github Desktop.
-
You could use the Github Desktop
Repository > Open in Command Prompt/Terminalmenu item: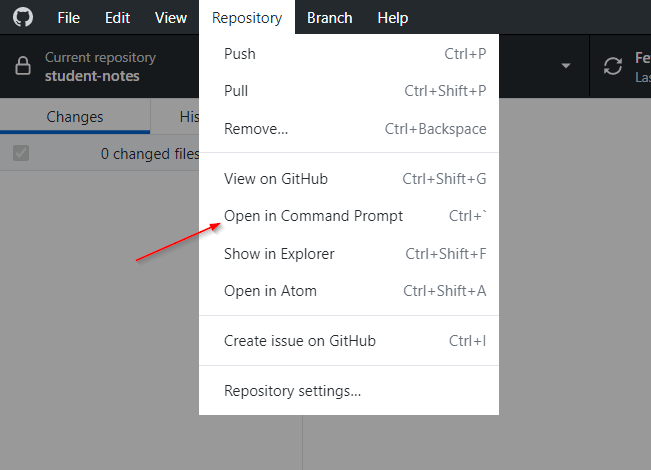
Now, look at the following docker command, but don’t run it yet. First, look at it in
multi-line form (this multiline form is not valid in Windows shell prompts):
docker run \
  --rm \
  -it \
  --volume="${PWD}:/srv/jekyll" \
  --publish 4000:4000 \
  jekyll/jekyll:3.8 \
  jekyll serve
Here is the same command, all on one line:
docker run --rm -it --volume="${PWD}:/srv/jekyll" --publish 4000:4000 jekyll/jekyll:3.8 jekyll serve
First, understand the command:
- The
runcommand starts a docker container from imagejekyll/jekyll– specifically, the version tagged as3.8. - This will remove (
--rm) the container when we stop it. This is desirable, since otherwise, each time running the command would create a new container. -
-itgives us an interactive shell which will permit stopping the container viaCtrl-C. - The
--volume(equivalent to-v) flag mounts the current directory (${PWD}) inside the container. This makes your website files available to the container. - The
--publish(equivalent to-p) flag maps container port4000to your computer’s port4000. This means you will be able to access http://localhost:4000 from a browser on the host to view whatever is being served on that port within the container. - The last arguments are
jekyll serve. This is the command that the container will ultimately run. It will launch a webserver that will (1) build the website, (2) serve the built website, and (3) watch for new changes so that it can rebuild. It’s slick.
Now, run the earlier docker command.
From the output, you notice that the first thing the container does is install a
bunch of gems. Gems are ruby packages. While the image already includes a
bunch of installed gems, the container looks inside our Gemfile and sees that
it needs to install the github-pages ones.
Yawn, this takes a while.
…but once that’s done, you should see a message that your site is being served on
http://localhost:4000. Visit that url. Hopefully it’s working! If not,
![]() stop and panic. Otherwise, continue.
stop and panic. Otherwise, continue.
Jekyll is watching for filesystem changes. Use Atom to make a change to a .md
file in your repo. Confirm that log output shows that the change was detected.
Refresh the browser to confirm that the update has been applied.
_config.yml. You have to restart jekyll
to pick up changes to that file.Close the running container by running Ctrl-C.
Now, run the earlier docker command again (up-arrow to cycle through your shell’s history!).
Oh no, it has to install the gems again! Why doesn’t it remember? Because we
removed (--rm) the image. It starts fresh each time. That’s a feature of Docker.
But surely we can cache somehow?
Caching gems using a filesystem mount
The jekyll/jekyll
docs say that
a volume can be mounted to the container internal directory /usr/local/bundle.
Gems will be installed to that directory, and the container will look there
before installing them again. That’s what we want!
But there’s a gotcha for Windows users. The readme recommends the following flag:
--volume="${PWD}/vendor/bundle:/usr/local/bundle"
This would save installed gems to local project directory vendor/bundle. This
would in turn be included in the ${PWD}:/srv/jekyll volume mount. But there can be a lot
of files in that directory. And on Windows, mounted directories get really really slow
– like, jumping to a 5-minute-mount-time slow. Not good!
Caching gems using a docker volume instead
A solution instead is to install the bundled files to a docker volume, which are not be mounted to the windows filesystem. (They stay within the docker engine.)
Here’s
the docker volume docs. It says that if we specify a volume that doesn’t exist
yet, Docker will create it for us ![]() .
.
So, do that, naming the volume something like my-bundle:
docker run --rm -it --volume="my-bundle:/usr/local/bundle" --volume="${PWD}:/srv/jekyll" --publish 4000:4000 jekyll/jekyll:3.8 jekyll serve
Run the command and wait for the gems to install (stored in the volume). Then
kill the container, then run it again. It should skip the gem install step this
time, and be much faster. Kill it again and run it again, just
to feel the power. ![]()
Best practice: Add your docker command to a README.md file in your repo, so
you can remember it later.
Use docker-compose instead
But that’s a cumbersome command. Let’s use
docker-compose instead of typing that
monster out. It already comes installed with Docker-Desktop.
Create a YAML file in the root of your repo called docker-compose.yml with the following contents:
version: '3'

services:
  jekyll:
    image: jekyll/jekyll:3.8
    ports:
      - "4000:4000"
    volumes:
      - .:/srv/jekyll
      - my-bundle:/usr/local/bundle
    restart: unless-stopped
    command: jekyll serve

volumes:
  my-bundle:
    external: true
Then, from the shell, call docker-compose up, and wait a bit. It should work!
Close the running container with Ctrl-C.
Take a break ![]()
docker-compose up to launch your website locally.
Create a .gitignore file
Running the container creates a few folders and files in your local directory that you don’t want to commit to your repos, such as the following:
- A folder called
_sitewhich contains the built website. - The
vendor/bundledirectory from earlier, if you ran that command - A
Gemfile.lockfile which specifies and pins all installed gems to specific versions
To avoid committing these to your repos, create a file called .gitignore with the following contents:
_site
vendor/
Gemfile.lock
.sass-cache
.jekyll-cache
.jekyll-metadata
Commit changes and push
Once you are satisfied with your website modifications, you need to commit them
to your local repo, and then push (sync) those commits to your github copy of your
repo.
Review this Github Desktop guide for how to use add, commit, and push changes.
Following that guide, add and commit your modifications.
- Don’t forget to commit your
.gitignoreandGemfilefiles! - Write good commit messages!
Once you’ve pushed your commits to github, github will (eventually) rebuild your site. If it failed to build, you’ll get an email with an error message.
Supplemental
Nothing below this point is required. But that doesn’t mean it’s not good stuff.
Tips for following evanca’s Medium post
In Evanca’s Medium post, you upload a profile picture.
Setting image urls can be tricky.
Github has a special url format that will let you fetch a raw file as opposed
to a view of the file wrapped in the GitHub UI. To get the raw file, append
?raw=true to the url.
Try it for yourself using a browser:
- Visit the forked repository’s logo file without using
?raw=truehere: https://github.com/evanca/quick-portfolio/blob/master/images/demo.gif. Note that it is wrapped in the GitHub UI. - Then, visit it with
?raw=trueappended: https://github.com/evanca/quick-portfolio/blob/master/images/demo.gif?raw=true. You get the raw image file. This is what you need, so that your logo can be displayed in your website.
Note that the forked repository follows the above pattern:
# in _config.yml
logo: "/images/logo.png?raw=true"
Even though the log file stored in their repository’s /images/ folder is named just logo.png.
Using a custom domain for your <username>.github.io site
My website, https://daveeargle.com, actually points to a GitHub Pages site at https://github.com/deargle/deargle.github.io. If you want a swanky domain name too, then you can follow these instructions. The general idea is:
- Purchase a domain name from a domain name registrar such as Cloudflare.
-
Add a CNAME DNS record for your domain, setting your domain name to be a CNAME for your github-provided
<username>.github.iodomain.By default, your domain name registrar will also provide DNS service for you.
-
On the Settings tab for your github repository, add your purchased domain name to the “Custom domain” field, and save.
This will add a file called
CNAMEto the root of your repository, with your domain name as its contents. - ???
- Profit.
Connect Atom to Github
Hook Atom up to GitHub (the package comes bundled with Atom, because All Hail Octocat).
Click on the Github tab towards the bottom-right of your Atom window. Complete its login form.

Now, you can do the git “add”, “commit”, and “push” workflow from within Atom, without having to use Github Desktop.
Use Jekyll for Blogging
You’re in luck! Jekyll’s core competency is blogging! It’s not hard to tack
blogging onto your quick-portfolio theme. Follow my silly guide below:
Create a blog index page
Create a new file in the root of your repository to serve as an index to your
blog posts. Let’s call it blog.md. You might make it look like this:
---
---

<h1>Blog</h1>

<ul>
  {% for post in site.posts %}
  <li>
    <a href='{{ post.url | relative_url }}'>{{ post.title }}</a>
  </li>
  {% endfor %}
</ul>
The two sets of three hyphens at the top are called Front Matter, and they’re important. Read a jekyll guide to understand why.
This index page will loop through your site’s collection of blog posts, and render a link to each one. The page will be available at http://localhost:4000/blog. Go ahead and visit it.
Except for the nav bar on the left, it’s empty! That’s because you don’t have any blog posts yet!
Write a blog post.
Create a new folder in your repository exactly called _posts. Folders in the
root of your directory contain what
Jekyll calls a “collection.” By default, Jekyll has special rules for handling
a collection called “posts”.
Blog posts go in the “posts” collection – one file per blog post. Create a new file in this folder with a name using the following format:
MMMM-YY-DD-title-of-the-blog-post.md
Where the .md extension stands for “markdown.” Its content also must start with two sets of three hyphens. After those hyphens,
write the blog post content, using markdown (or html). For example:
---
---

This is a blog post called `2020-01-25-My-dog-ate-my-homework.md`.
It is a true story about how my dog at my _homework_, **again!**.

And here is a second paragraph going on about my doggo woes.
Save the file. Then, navigate again to your blog index at http://localhost:4000/blog.
You should see your new blog post listed there! Our blog index read the title, which it extrapolated from the filename.
Click the blog post to view it. It looks kind-of okay! But there’s a phantom “By” line, and an empty “tags” list. Let’s fix both of those.
Jekyll uses “layouts” to determine common styling for multiple pages, so that
you don’t have to repeat yourself across files. It makes updating styles easier.
The style for your theme’s posts is found in the jekyll theme that quick-portfolio
uses. (While the quick-portfolio theme overrode the “layouts/default.html”
theme, it did _not override the theme used for posts. So we must look to the default.)
By examining _config.yml, we see that the theme being used is
jekyll-minimal-theme, and its
layout for posts is found
here.
Follow the link to see the posts layout.
Fixing the By-line
Examine the posts layout. Notice the sets of double curly braces. These are Jekyll
(Liquid) templating
placeholders. For the “By” line, we see that the theme is referencing the
page.author and site.author variables:
{{ page.author | default: site.author }}
page.author means that if our blog post had an author set, it would have been
set in the post Front Matter, between the sets of hyphens. Front Matter is
written in a config language called YAML. Like this:
---
author: John Doe
---
But it would be lame to have to repeat that for each blog post. We look back to
the theme and notice that it references default: site.author. In jekyll,
site. variables are read from _config.yml. So, add a key-value entry in your
_config.yml file for author:
author: put your name here
Restart your local jekyll server to read in changes to _config.yml. Reload the
blog post. Your name should be there!
Fixing Post Tags
Examine the default posts layout again. It includes the following snippet:
{% if page.tags %}
<small>tags: <em>{{ page.tags | join: "</em> - <em>" }}</em></small>
{% endif %}
We see that it’s looking for page.tags. Read the jekyll docs on specifying tags. We see that
in our posts’ front matter, we can
specify either a tags key or a tag key.
For this example, let’s set the latter, leading to a blog post that looks like this:
---
tag: lies
---

This is a blog post called `2020-01-25-My-dog-ate-my-homework.md`.
It is a true story about how my dog at my _homework_, **again!**.

And here is a second paragraph going on about my doggo woes.
Jekyll should have automatically detected your changes and rebuilt your site. Refresh your blog post webpage. You should see that it lists its tag now!
Multiple tags are left as an exercise to the reader.
Adding blog post dates to the blog index
Spicing up our blog index a little bit, let’s list the blog date in the url.
A post has its date available as a variable, acessible via .date. And, the
templating language for Jekyll is a fork of the language called Liquid.
Liquid includes filters, including
date_to_string. We can use it by piping in post.date and setting some
arguments, like this:
{{ post.title }} | {{ post.date | date_to_string: "ordinal", "US" }}
Making our blog index look like this:
---
---

<h1>Blog</h1>

<ul>
 {% for post in site.posts %}
 <li>
   <a href='{{ post.url | relative_url }}'>{{ post.title }} | {{ post.date | date_to_string: "ordinal", "US" }}</a>
 </li>
 {% endfor %}
</ul>
Not bad!
Add a link to the blog index
But how will anyone find our blog index? Let’s modify _layouts/default.html
to include a link.
I added this line at about line 33, after the closing endif to the check
for whether the site is a github user page, like this:
... snipped ...

{% if site.github.is_user_page %}
<p class="view"><a href="{{ site.github.owner_url }}">View My GitHub Profile</a></p>
{% endif %}

<p class='view'><a href="{{ '/blog' | relative_url }}">View my Blog</a></p>

... snipped ...
Refresh your homepage, and you should see a link to your blog post on every page.
Live example
I forked the quick-porfolio theme and made the above changes to it to enable
blogging. View the fork here,
and examine the blog-setting-up commit here.
Conclusion
The above is an insultingly shallow overview of blogging with jekyll. But it should show you how you can make some small tweaks to your layout to quickly set up with blogging. Hopefully it inspired you! Ask me for clarification and I’ll come back and update this doc. Glhf!