Lab -- Python for Data Science
In this lab, you will learn several ways to get a python data science development environment. Before you can craft, you need a crafting table. And we can't just go around punching trees!
By Dave Eargle
Part 1: Musings on Jupyter: Why, and Where
Doing data science with python obviously requires a python development environment. Jupyter Notebooks are a great default data science development env. Consider:
- Code, its output, and markdown descriptions of code are all included
in one file.
- Images are embedded in that single file, via base64 encoding
- Open an
.ipynbfile in a text editor to see it in its.jsonform.
- Jupyter notebooks can be converted to formats such as HTML or PDF, which are
viewable in a browser.
- No need to install beefy statistical packages to read files (looking at
you,
.JMP…)
- No need to install beefy statistical packages to read files (looking at
you,
Also consider: academic journal articles often have a “data replication” problem. What code led to the tables and figures in a paper? The open science movement pushes for code to be included in papers’ appendices. Jupyter notebooks meet that goal.
One downside of Jupyter notebooks is that it’s difficult to do live google-doc-style collaboration. From my understanding, this is a limitation of the underlying notebook data model, making a shared data model between collaborators difficult to implement. But as of 2022-01-17, it looks like live collaboration is in beta!
Jupyter notebook servers
Editing Jupyter notebooks requires a running notebook server. Browsers are one way to interact with that server.
Local jupyter notebook servers
A Jupyter notebook server can be run from anywhere you can install the python packages.
Hosted jupyter notebook servers
Alternatively, you can use a jupyter notebook server hosted somewhere else.
A few free (but resource-limited) notebook servers:
A few ones on cloud computing platforms (variable resources in exchange for your $$):
Resource differentiators include:
- Available resources
- RAM, GPU, disk space?
- Number of concurrent users?
- Available packages
- pre-installed?
- platform-specific integrations?
Converting Jupyter Notebooks to read-only formats
Jupyter notebooks can be converted into other read-only formats, including HTML,
using an included tool called nbconvert. Several online tools will run
nbconvert for you, and show you the HTML output. These include:
How to choose where to run your jupyter server?
Consider the following:
- Is privacy or confidentiality a factor?
- Do your notebooks need access to datafiles on certain internal networks?
- Do you need more computing resources than your personal computer can provide?
The importance of reproducible notebook environments
You need notebook environment reproducibility if:
- You want to be able to run your notebooks from any computer
- You want someone else to be able to run your notebooks
If your notebook requires hard-to-install packages, do you want someone else to have to install those packages to be able to run your code? That might take hours or days of fiddling.
Or maybe you want to be nice to future-you. Steps you take today to configure your environments can be a huge pain – do you want to have to repeat it?
If you’re collaborating – especially if you’re collaborating – you don’t want to hit the “works on my machine” problem. You want to pin dependencies. You want reproducibility with as low friction as possible – for your future self, and for others.
Available packages
Your code might need special python packages, as well as special system applications.
For python packages, the important thing to know is this: Jupyter will have access to any package installed in the python environment that is running the jupyter server.
- If you run
!!pip install ...within a jupyter notebook cell, those packages get installed into the python env that is running the notebook. - And if you run
pip install ...outside of the jupyter notebook but in the same environment that launched the jupyter server, those packages will be available, without needing to restart the kernel or anything.
What’s the deal with Anaconda?
Anaconda is amazing if you need specific python packages. It’s great because
it is bundled with many packages that data scientists already need. If you had
to compile these packages from source (like if you installed via pip), you
might spend a lot of time configuring your build environment. If you find
yourself in that position, consider Anaconda. instead (or Docker).
conda is a package manager through which you can install more packages.
Anaconda includes conda. The conda package ecosystem doesn’t have as many
packages as does the pip ecosystem.
pip into an environment, you're likely to hit problems if you try to use conda to install afterwards.
So, once you use pip in an environment, environment, don't ever
install via conda into that environment again.Confession: Years ago, I used to think that Jupyter(Lab) was specific to Anaconda, because the first place I saw Jupyter was in Anaconda Navigator, where it gets its own big square on the UI. That made me not want to use it because it feels like it takes so long to launch Anaconda Navigator.
But Jupyter is not specific to Anaconda!
And you can get precompiled packages without Anaconda! Instead, you can use Docker jupyter notebooks. Specifically, Docker images from the Jupyter Docker Stacks. Browse the list there and you’ll see environments ready-to-go with heavy-hitters like tensorflow, pyspark, Julia, R. Whereas Anaconda includes packages that can work on multiple systems, Docker says “forget that multi-OS crap” and chooses just one OS to build the packages for, and then runs that single OS everywhere. I therefore prefer Docker, because I prefer things that say “forget that crap.” And Docker is so relatively easy to launch in different places, compared to fiddling with configs. You’ll see!
Part 2: Use a Jupyter Docker Stack
There are Docker containers that already contain Jupyter, maintained by the Jupyter organization. You’ve already used one in your other classes, but you need to use moar of them. And understand them moar. Moar!
Check them out here. Browse their different available docker images. Note the variety of included packages!
The further down the list you go, the more packages come pre-installed in the image. Many images inherit from one another. But also, the bigger the image becomes, so the longer it takes to download.
Which one is your favorite?
Setup: Create a new project folder called “my-datascience-notebook”
Do all of the steps in this part from a new project folder on your computer. This project will store your datascience jupyter environment – you might call it “my-datascience-notebook”.
Do not nest this folder within another project folder!
Create a local git repo and publish it to GitHub
Let’s try a new way of creating a repository on github – by first creating a git repository on your local drive, and then publishing that repo to github.
Use Github Desktop to turn your project-folder into a git repository. To do
this, you can use the File > New repository... menu item. pointing it to
your already-existing directory. The trick is to point the “local path” to the directory containing your folder, and to name the repository the name of the folder that already exists. For instance, if my folder were called my-datascience-notebook and if that folder were located in local path C:\Users\deargle\projects, I would enter the following:
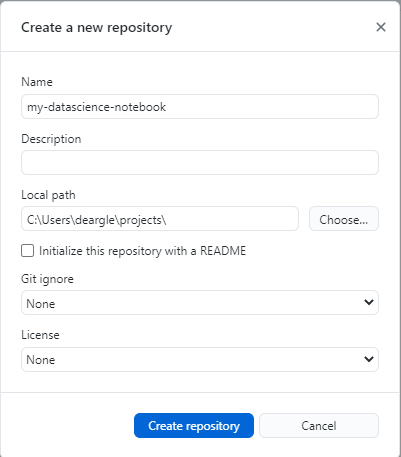
You should then have an option to publish your repo to Github. You can do this even if you don’t yet have any commits – Github Desktop creates one for you.
Create a README.md
Only monsters have repos without READMEs. Make one – have it start with the name
of your repo. For instance, if my repo were named my-datascience-notebook,
I would start with a README.md with a level-1 header like this:
# My Datascience Notebook
Run the jupyter/datascience-notebook docker image
I know you’ve already used the jupyter/pyspark-notebook image from this
collection in another class. Now, use Docker Desktop to run the
jupyter/datascience-notebook one. Follow the tips in
the quickstart.
You can use the following docker-compose.yml file to run the container:
version: "3"
services:
  jupyter:
    ports:
      - "8888:8888"
    volumes:
      - .:/home/jovyan/work
Extend it!
But imagine that the image doesn’t have your favorite package,
eli5. How could you get eli5 running in
your jupyter environment?
Option 1: You could install it every time you create a new docker container, via
running !!pip install eli5 in a jupyter notebook cell.
Option 2: You could build a custom docker image that already has it
installed. ![]() Yes, let’s do that! Yes!
Yes, let’s do that! Yes! ![]()
Read over the guide here. But don’t do anything yet.
Get the tag
Then, follow the link to the “Docker Hub image tags” from the docs page for the
image. For perfect environment reproducibility, we want
to use a tag that will always point to the same docker image version. The
“digest” is a hash (fingerprint) of the image version. We can’t use the latest
tag, because that always points to the most recently released tag. But multiple
tags can point to the same digest. So:
- Note the digest of the
latesttag. -
Find another tag with the same digest that looks like it will be permanent. For instance, today is 2022-01-27, and I see a
2022-01-24tag that has the same digest aslatest: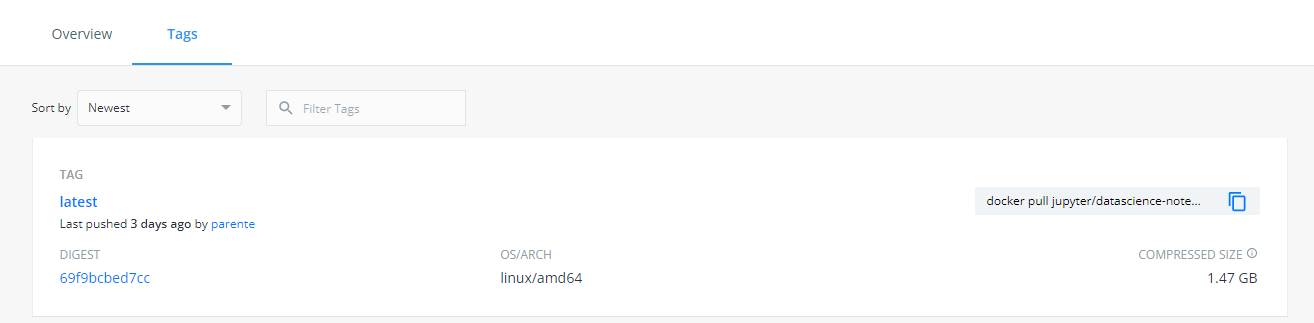
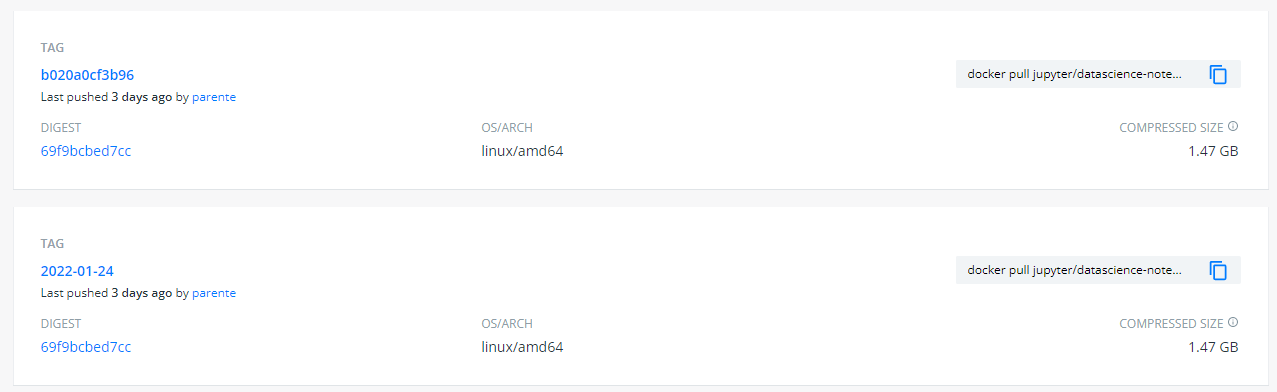
So I will use the
2022-01-24tag.
Write a Dockerfile
The below Dockerfile is a modification of the one from the example.
# Start from a core stack version
FROM jupyter/datascience-notebook:2022-01-24
# Install from requirements.txt file
COPY --chown=${NB_UID}:${NB_GID} requirements.txt /tmp/
RUN pip install --quiet --no-cache-dir --requirement /tmp/requirements.txt && \
    fix-permissions "${CONDA_DIR}" && \
    fix-permissions "/home/${NB_USER}"
Interpreting the Dockerfile:
-
FROMmeans that our Dockerfile extends/inherits all commands from the thejupyter/datascience-notebookDocker image: specifically, the version of that image tagged2022-01-24 -
NB_UID,NB_GID,CONDA_DIR, andNB_USERare env vars set up in the referecedFROMdockerfile. -
COPYcopiesrequirements.txtfrom your local drive into the Dockerfile, making it available during the docker build steps. -
RUNbasically callspip install -r requirements.txtwith some extra stuff following that I guess “fix [file and directory] permissions” to work with whatever theFROMDocker image expects.
Create a requirements.txt file and pin your package versions
Now create a file called requirements.txt that follows the pip requirements
file format.
Pin your package version, for the sake of environment reproducibility. To see
what the latest version of eli5 is that pip install eli5 will install,
search the internet for pip eli5 and click the link for https://pypi.org:
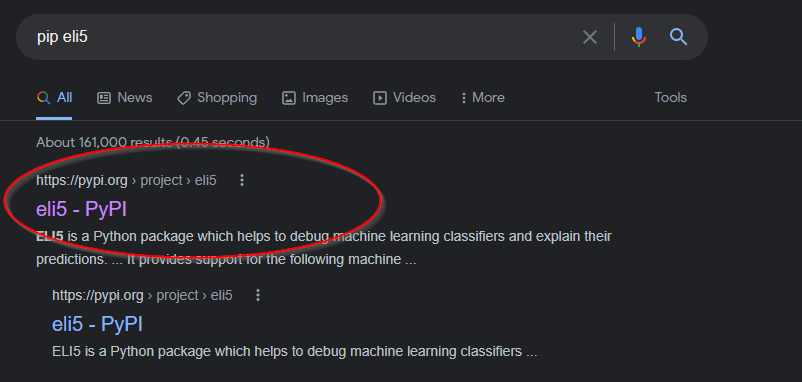
Then, note the package version:

Then, add a line for that requirement to requirements.txt:
eli5==0.11.0
Build your image and run a container
Once you have that Dockerfile, build your own image from it by running the following snippet from the docs:
docker build --rm -t jupyter/my-datascience-notebook .
Run the following to look at your new image:
docker image ls
Run a docker container from your image!
docker run --rm -it -p 8888:8888 jupyter/my-datascience-notebook
Lab deliverable todo: Update your
README.md with the instructions (notes-to-self) on how to use your image with
docker
Publish your custom image
It’s so beautiful! But it only exists on your computer, and you want to share it. What can you do?
Option 1: The image it is FROM is hosted publicly. So you could just publish
your Dockerfile in a public place like GitHub, and let others build it themselves.
Option 2: Or we could do one better and publish our dockerfile to a public docker image repo, such as DockerHub!
- Log in to https://hub.docker.com, creating an account if necessary.
-
Create a new “repository” that will store your image. Note its name.
My username is
deargle, and I named minemy-datascience-notebook. This means that my image will live atdeargle/my-datascience-notebook, available here. -
Use docker to re-tag your image using its dockerhub name. For example, I did this:
docker tag jupyter/my-datascience-notebook deargle/my-datascience-notebook - Then, push your image to dockerhub! For instance, I ran the following:
docker push deargle/my-datascience-notebook -
Test that you can pull your image. For instance, I ran the following, and got the following success response:
$ docker pull deargle/my-datascience-notebook
Using default tag: latest
latest: Pulling from deargle/my-datascience-notebook
Digest: sha256:a39a6c3d0be65f82baa900cfa2e26be481190f1907e54740c7d2a451e5bd47a9
Status: Image is up to date for deargle/my-datascience-notebook:latest
docker.io/deargle/my-datascience-notebook:latest
Great!
Lab deliverable todo: Update your
README.md with a link to your DockerHub image (use Markdown!)
Use docker-compose instead
We can do all of the same with the conveniences of docker-compose.
Read the overview of docker-compose.
Then, create a docker-compose.yml file like mine below. Read the explanatory comments.
version: "3.9"  # the docker-compose.yml specification version that this file uses
services:
  jupyter: # arbitrary key/name for the container
    build: . # look in the local directory for the Dockerfile
    image: deargle/my-datascience-notebook # `push` to this repository (defaults to DockerHub)
    ports:
      - "8888:8888" # publish container port 8888 to host port 8888
    volumes:
      - .:/home/jovyan/work # Mount the local directory to container-directory `/home/jovyan/work`
                            # (The jupyter-docker-stacks docs tell us to mount it here)
N.B.: This one is different from the earlier docker-compose.yml file, because it
includes a build tag *and* an image` tag.
Now, you can do things like:
- build and run the container using
docker-compose up - publish your built images to DockerHub using
docker-compose push
Lab deliverable todo: Update your README.md with instructions (notes-to-self) on how to use your image with docker-compose.
Checkpoint
Your repo should now have the following files:
Dockerfiledocker-compose.ymlrequirements.txt- An up-to-date
README.md
Sync (push) your local commits to github.
Part 3: Use MyBinder
Now you have a Dockerfile in a public github repo. That means we can use
another free online service called MyBinder. This
service builds jupyter notebook docker containers and runs a jupyter server
instance that you can access from your browser. If we point it at our repo with
our Dockerfile, it will run a Jupyter container from an image from that
Dockerfile.
If your repo also includes .ipynb files, it will open those
notebooks in editable mode.
Since your github repo is public, you can point MyBinder at it. Do it:
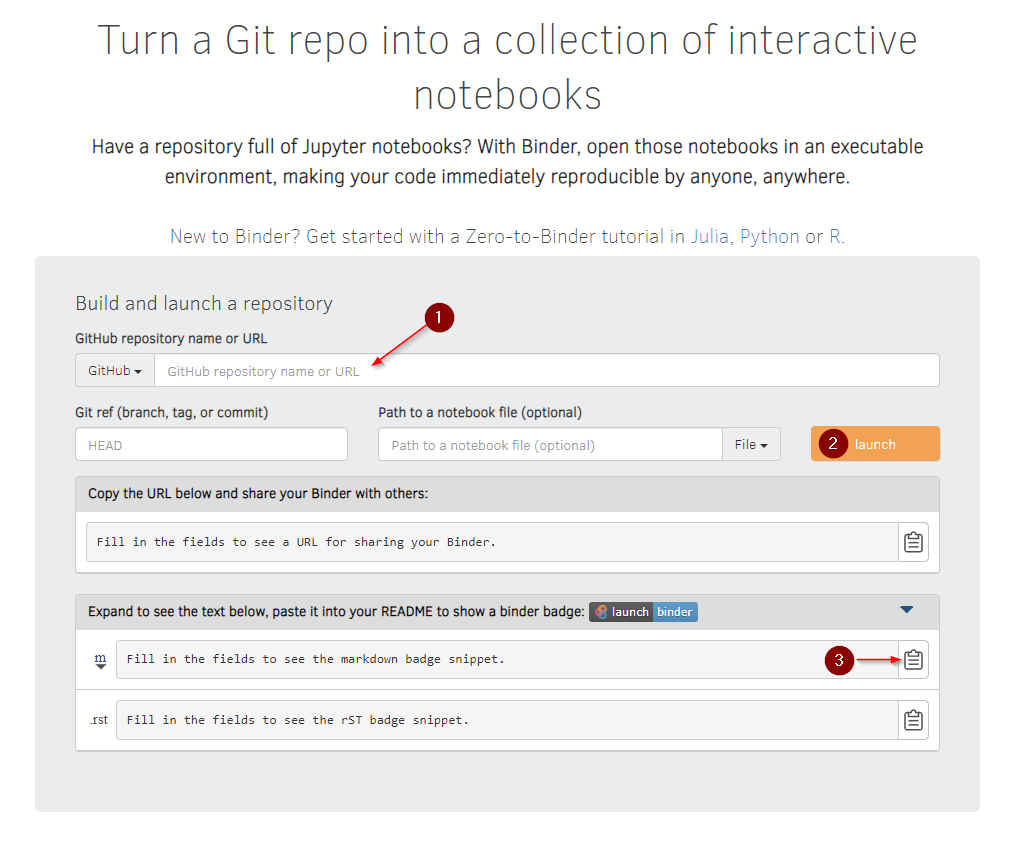
Legend:
- Paste your Github url here.
- Click to launch your image. It will take a while to fetch your image and build your container. When it’s done, a jupyter window will open.
- Click to copy a markdown snippet. You can paste the snippet into your repo’s README to get a mybinder button in your repo.
Deliverable
Your deliverable is to submit a link to your github repo that meets the following requirements:
- Contains a README following the template below.
- A working
docker-compose.ymlfile - A
Dockerfile- Should extend (
FROM) a Docker Jupyter Stack image of your choosing. - Should install extra packages from a local
requirements.txtfile.
- Should extend (
- A
requirements.txtfile- Should install at least one extra package not
already in the image, such as
eli5. - Should pin the package version.
- Should install at least one extra package not
already in the image, such as
Here’s a bare-minimum example directory tree:
my-datascience-notebook
├── Dockerfile
├── README.md
├── docker-compose.yml
└── requirements.txt
Here’s a README template to fill in:
# Project Title
This is a short description of the project. E.g., "This repo is my custom jupyter datascience image..."
[](your-mybinder-link)
The built image is [hosted on Docker-Hub](link-to-your-dockerhub).
## Using this repo
### With `docker`
Build:
```bash
docker build fill-in-the-rest
# Should explain how to build the image, including tagging it
```
Run:
```bash
docker run fill-in-the-rest
# - Should publish port 8888
# - Should mount the local directory as a volume in the
# container's home directory
# - Should `--rm` container when done
# - Should use `-it` mode
```
### With `docker-compose`
Build and run:
```bash
docker-compose up
# - It should publish port 8888
# - It should mount the local directory as a volume in the container's
# home directory
```
Additional Resources
Adding a CI/CD GithubAction to deploy to DockerHub
With our current setup of needing to manually and separately run docker push
and git push, there’s a risk that the two will get out-of-sync.
We can fix that by adding a Github Action to our repo that will automatically push an
update to DockerHub every time we push to our github repo.
To do this, see the following resources:
- The docker.com guide on using Github Actions
- The docker-owned
build-push-actionGithub Action - My messy Github Action implementation
Tips:
- Remember to change the “tag”
user/appto be your DockerHub username and your repo’s name. - Also see https://github.com/docker/login-action#docker-hub for understanding how to
authenticate using the
login-actionAction.
Also, see peter-evans/dockerhub-description to get your repo’s README posted as your Docker Hub repo’s description.
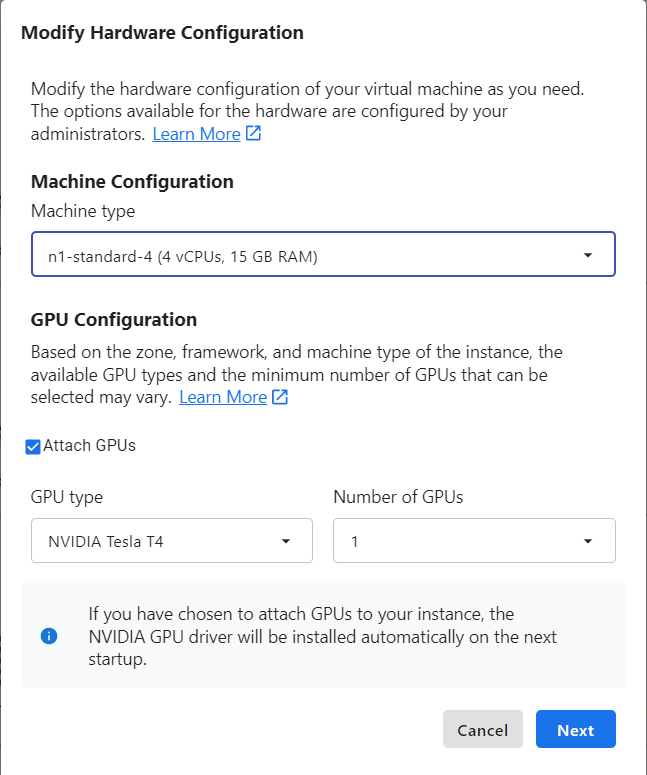
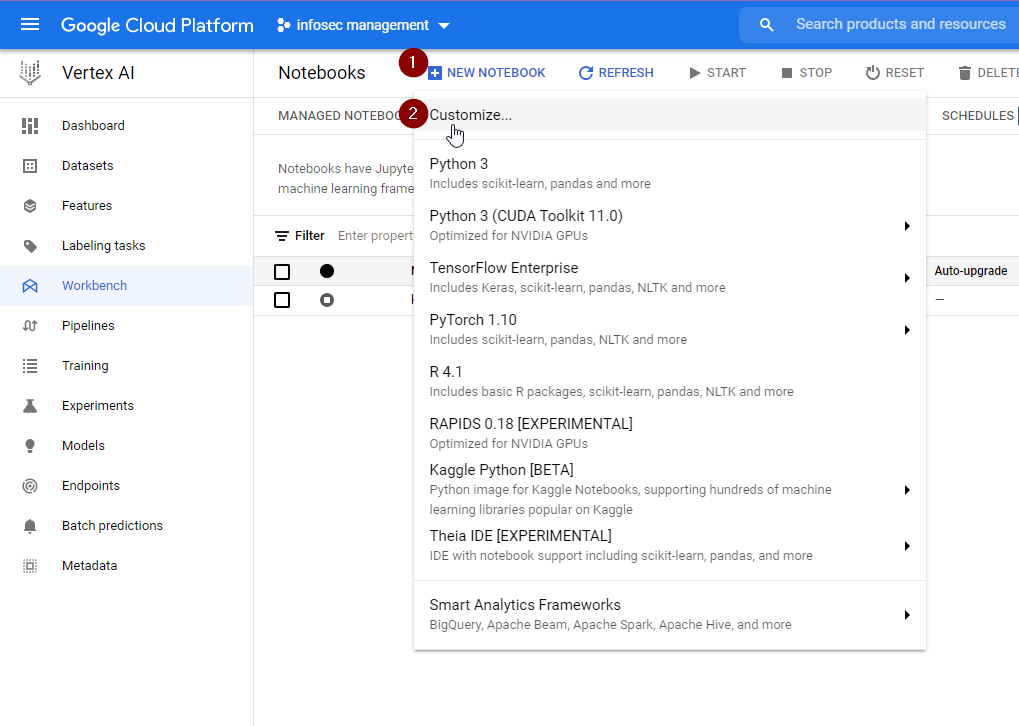
Running a Managed Notebook Instance on GCP
If you need extra computing power, you can run Jupyter Notebooks on cloud computing platforms, such as GCP’s Vertex AI Managed Notebooks Instance. This service aims to make it ridiculously easy to crank up your available resources with just a few clicks, and get them to run in a number of environments.
Screenshots below taken on 2022-01-17.

If you need more environment customization, you can instead launch a User-Managed Notebooks Instance. You could even launch your custom DockerHub image into one of these, although you’d need to do further modification to it to make it compatible with Vertex AI
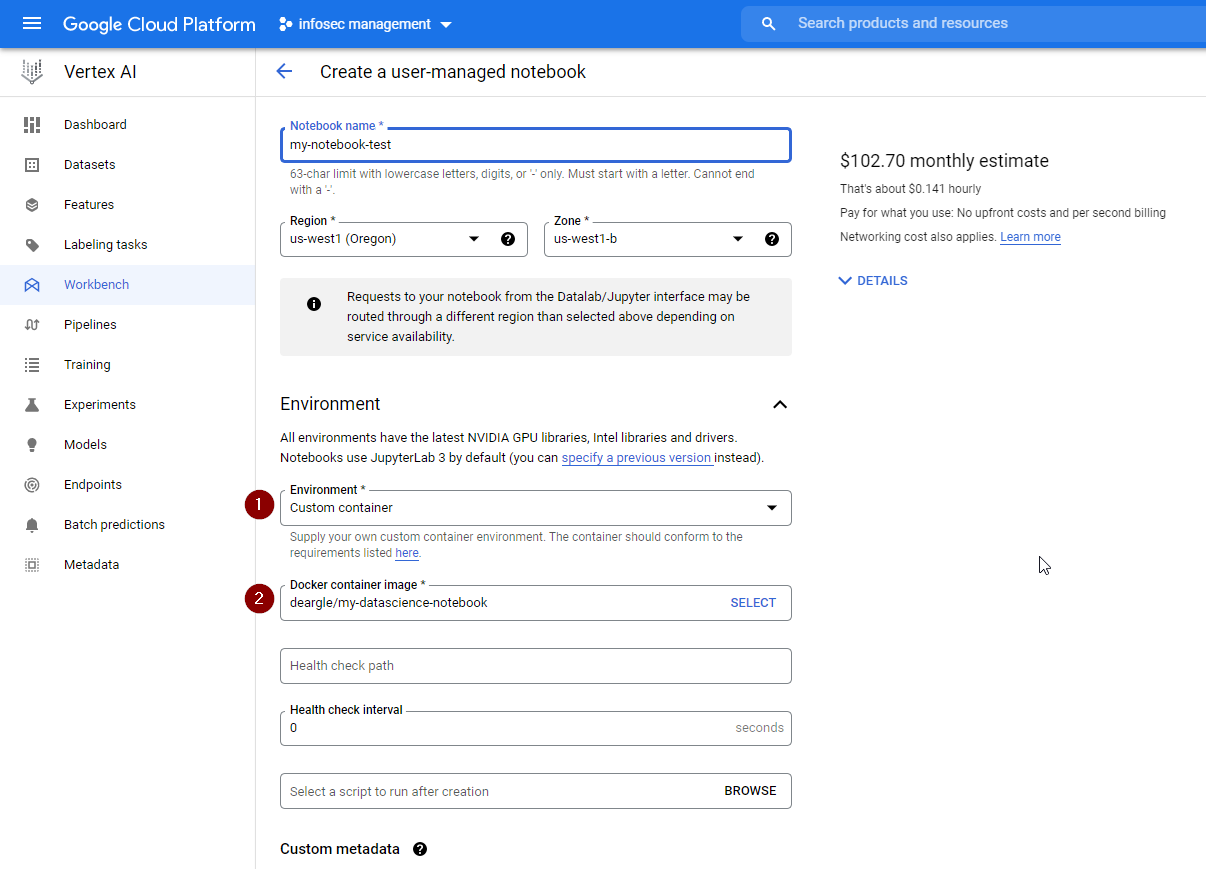
Under the hood, these launch a virtual machine, run docker pull and docker
run in it for you using jupyter docker container you specify, and then set up
some convenience ways to make it easy to access the notebook server. The
convenience is nice.